How to use Automation in CJPath
Imagine closing more deals, nurturing leads like a pro, and streamlining your workflow – all without lifting a finger. Highlight the specific benefits of automation and the value it adds to the reader's workday.
In this blog post, I will guide you through creating your first automation using CJPath.
First, automation refers to the use of software tools and technologies to streamline and enhance various aspects of customer relationship management. This can greatly improve efficiency, accuracy, and customer satisfaction.
A simple example of automation in a CRM system could be an automated email to new leads. Here's how it works:
- Trigger: A potential customer fills out a contact form on your website, expressing interest in your product or service.
- CRM Automation: Import contacts to your CRM system or use an API to be added automatically.
- Action: Without any manual intervention, the CRM system sends a pre-written email to the new contact. This email might thank them for their interest, provide additional information about your products or services, and outline the next steps, such as scheduling a call or directing them to resources.
This automation ensures that every new potential customer receives immediate and consistent communication, improving the customer experience and freeing up time for your team to focus on more complex tasks.
Now, let's create this automation using CJPath.
First, open automation (1) page and click New automation (2).
Select automation's trigger. in this example we will select when a new Lead created.
From the right menu, select "Lead" than "Lead created" (1) and click next (2).
Now the trigger has been created successfully. To create more automation options, click the blinking green plus.
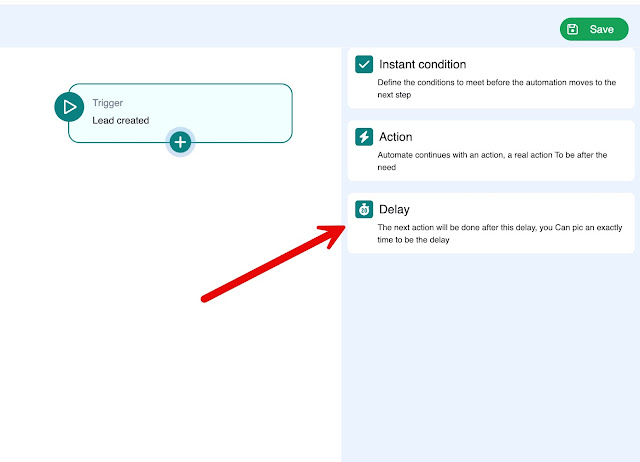
We will add a delay, between the add of a new lead and the email to be sent. Let's set 5 minutes. Click the green plus and select "Delay".
Set delay value to 5 minutes (1) and click next (2).
Now, after 5 minutes let's add an action. Click the green plus after the delay (1) and select "Action" (2).
From the right menu, open Email option (1) and select "Send email" (2) then click next (3).
Now form your welcome email as you want. Start by writing an email subject (1) then email body (2) and click next (3)
Congratulations! Your automation is now active. Feel free to imagine any automation you desire and create it as we did previously.
Do you have any questions? Please feel free to ask them in the comments section below.


thank you for the informations
ReplyDelete